Crochet Practice 4: Major Progress
I decided to finally get started on the chicken bag I wanted to make. I have been thinking about making this project for weeks now, and I was nervous to get started. I was expecting a complicated pattern, frustrating instructions, and plenty of restarting.
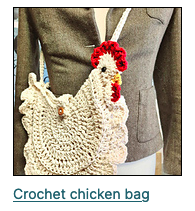
Now, to a beginner like me, this pattern was complicated. But, instead of restarting this project over and over again, I ended up making the entire first panel of the bag in one sitting! Because I had prepared myself for this project to take a lot of time, I had set my expectations low and was able to accomplish a lot.
Looking back, the bag was actually pretty simple. Each panel (which make up the body of the chicken) were only about 8 rows. In non-crochet terms, that translates to barely anything. There are 3 reasons this bag was made in so few rows: it used two strands of yarn (with a big hook), it was almost entirely (in US terms) double crocheted, and there were a lot of stitches on one row.
Two strands of yarn is exactly what it sounds like: instead of one piece of yarn on the hook at a time, I used two (I had bought two balls of yarn to use, and pulled a strand from both). This means the yarn was a lot thicker and covered more ground in fewer stitches. The bigger hook also contributed; the pattern said to use a 7mm hook with medium weight yarn, but I only had an 8mm hook. So, there was more spacing between each stitch than even the pattern recommended. I was ready for this to be an issue with my bag, but the extra spacing wasn’t even noticeable. It also made the bag bigger, which was perfect!
Double crochets (in the US) mean that each stitch starts with two strands of yarn on the hook, then yarn is pulled through twice, making the stitches longer. I had never tried this type of stitch before this project, and this bag was entirely made of them. Thankfully, searching for tutorials on Youtube brought me the perfect explanation of how to do it:
The pattern also had me do some “half double” and “treble” crochet stitches, which the same Youtube channel also had tutorials on:
The final reason this bag had so few rows was because there were a lot of stitches on each row. It started with 12 stitches, but by the end I was working 70 stitches across. This means each row was very time consuming. Plus, I always make sure to count my stitches at each round, which was very tedious.
As I said, I made the entire first panel within a couple hours of crocheting. I took a break before picking up the next panel, but that was completed in a similar time. This sounds like a long time to make, but I had expected this project to take me multiple days! Instead, I had the two body panels done the day after I began.
I still had to crochet the connection between the two panels, which made the bag wider and able to hold more. This was also done with double crochets, so it didn’t take long either. I put in made-for-crochet eyes and added the chicken’s comb, beak, and wattle.
The beak actually took a bit of innovation; I didn’t have yellow or orange yarn in the right weight. I had the perfect colour in a much-too-thin yarn, so I decided to quadruple strand the yarn. I pulled yarn from both ends of the ball, then folded both strands over until I had four. I had to estimate the length of yarn I would need, since I’d have to restart the beak if I ran out. Luckily, I had the perfect amount first try!
The next step was to sew together a fabric lining for the bag. This was definitely the most improvised part of this project so far, since all I had was a dollar store sewing kit and a cheap thrifted shirt for fabric. Luckily, that took off any pressure to make the lining perfect, so I could just get it over and done with. My lining is scrappy and probably won’t last forever, but I can always make a better one further down the line! All that matters is that it works and I like it.
I crocheted a clasp for the bag, and sewed a button to the lining I had made earlier, making sure to run the thread through the button multiple times for a strong hold. The button went right in the center of the magic circle that had begun the bag with (a perfect placement for it!) The button is a snug fit into the clasp, but this actually holds strong!
The final step for this bag was to make its strap. I crocheted into the head end of the chicken, and made a long chain, until I felt it was a good length. Figuring this part out took the most testing and changes of the whole project, but it worked out. All I had to do next was double crochet back over the chain and the strap (and therefore the bag) was complete!
This project taught me so much about crochet. I learned plenty of new techniques, but I also realized how little pressure I need to put on a project. I was missing multiple recommended materials (7mm hook and yellow yarn) but still managed to make things work. I know now that crochet is an adaptable medium, and I’ve built enough experience to have some freedom with it.
I am so excited to have this project done. It was a big goal for me to check off, but I’m mostly just inspired to create more now that I know what I’m capable of making!